Rabu, 26 Maret 2014

Repost: Models of Communication

As a student in collage, I think I rarely write/post about something related to my majority. So, in this post I'd like to share something called Model of Communication. Model of communication is the basic structure that a communication majority must knows. On the last class, the lecturer had reminded me on how important is this and we can't ever looking down on it only as a basic that can be forget.
I decided to post this also because I want to recalled the memories and I wish, it can remind me on how important basics lessons are.

Source: http://www.tutorialspoint.com/management_concepts/communication_models.htm

Introduction

For decades, man has known the importance of communication. Today, with various means by which one can communicate, it has become much easier to communicate a message to the other party, than it was several decades ago.
Every organization, no matter what their expertise and where they are situated, and what scale they operate, realize and value the importance of good communication.
This communication for organizations takes place both within the organization as well as with other outside stakeholders outside.
Therefore, it is vital for any business organization to understand the communication models out there, so they can use them for enhancing effective communication in the organization.

Understanding Communication:

Communication today is mainly of three types:
  • Written communication, in the form of emails, letters, reports, memos and various other documents.
  • Oral communication. This is either face-to-face or over the phone/video conferencing, etc.
  • A third type of communication, also commonly used but often underestimated is non-verbal communication, which is by using gestures or even simply body movements that are made. These too could send various signals to the other party and is an equally important method of communication.
The basic flow of communication can be seen in the diagram below. In this flow, the sender sends a message to the receiver and then they share the feedback on the communication process.
Communication Model
The methods of communication too need to be carefully considered before you decide on which method to uses for your purposes. Not all communication methods work for all transactions.
Once the methods of communication have been understood, the next step would be to consider various communication models. Due to the importance of communication, different types of models have been introduced by experts over the years.
The models help the business organizations and other institutions to understand how communication works, how messages are transmitted, how it is received by the other party, and how the message is eventually interpreted and understood.

Different Communication Models

Let's have a look at some of the famous and frequently used communication models used nowadays.

Shannon's Model:

One of the earliest models of communication that introduced was Claude Shannon's model. This was introduced in 1948.
This laid the foundation for the different communication models that we have today, and has greatly helped and enhanced the communication process in various fields. This model can be considered as the granddaddy of many later communication models.
Following is a simple illustration of this model.
Shannon's Model
The diagram above clearly illustrates how communication takes place, and also helps one to determine what could go wrong.
In Shannon's model, the information source typically refers to a person, who then sends a message with the use of a transmitter.
This transmitter could be any instrument today, from phones to computers and other devices. The signals that are sent and received can be vary depending on the method of communication.
The box at the bottom called NOISE refers to any signals that may interfere with the message being carried. This again would depend on the method of communication.
The receiver is the instrument or the person on the other side that receives the. This model is the simplest models to understand the workings of the communication process.

Berlo's Model:

Another famous communication model is Berlo's model. In this model, he stresses on the relationship between the person sending the message and the receiver.
According to this model, for the message to be properly encoded and decoded, the communication skills of both the source and the receiver should be at best. The communication will be at its best only if the two points are skilled.
Berlo's model has four main components and each component has its own sub components describing the assisting factors for each.
Following is the illustration of this model.
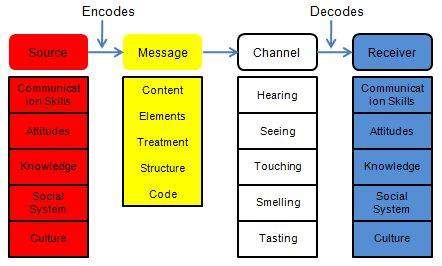
Berlo's Model

Schramm's Model:

Schramm on the other hand, emphasized in 1954 that both the sender and the receiver take turns playing the role of the encoder and the decoder when it comes to communication.
The following diagram illustrates the model proposed by Schramm.
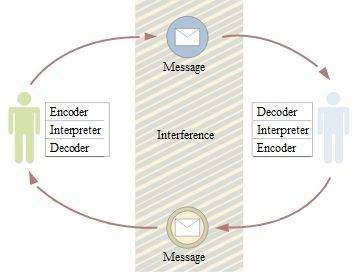
Schramm's Model
These models have been followed by various other models such as the 'Helical' model, Aristotle's models and several other models.
You should always keep in mind that each of these models has both their advantages and disadvantages. While some communication models try to break down the whole process in order to make it easier to understand, they are not always as simple as they seem.
There are several complexities involved in communications models. This is one thing that needs to be carefully understood in the process of understanding how these models work.

Conclusion

You need to keep in mind that these complexities that accompany the communication models may only make understanding the communication much harder.
It is best that both parties, the source (sender) and the receiver, are clear about what they would like to discuss. This is also known as the context of the message.
This would make it much easier to decode what the other party is saying without too much trouble. The process of communication, if kept simple and to the point, should not usually have too many issues, and the message will be easily understood by both parties.


Minggu, 16 Maret 2014

How To Create Blogger Template From Scratch (Repost)

Happy Monday! Today I would like to repost how to make your own Blogger template. I told you, I only repost this from another blogger. I didn't own any of this information besides I still learn the basic way how to make Blogger template. So, from this post, I hope we could learn together as I still figure out how to design my own blog. If you have intersted to design your own blog like me, I think this is a good lesson for you. Thanks for visiting and reading :)

Source: Bloggeryard.com

Create Blogger Template
As we've been always talking about Blogger and blogging, today we're going to make a long discussion on one of the most popular question asked blogger.com users that how to create a blogger template. Many bloggers have asked me this question on Facebook and through other contact services so I thought why not should I make a long post specially for them. Basically, This thing come in Web Design and Development so a person must have these skills in order to create blogger template otherwise reading and understanding this long article will be wasted. Today, I'll not take your too much time in this kind of discussion so let's start discussing about the main topic.
Requirements To Create a Blogger Template
First of all, I would like to mention the requirements which everyone should have fordesigning or creating blogger template because any common man can't easily make blogger templates it needs several skills. The first thing is that, you should know Blogger.com perfectly. How to create blog, making posts and pages, doing little customization, playing with gadgets and also how this platform actually works. After this, The basic knowledge of web design required in which HTML and CSS are most important. In blogger, We can use HTML, CSS, XML and JavaScript. If you know all these languages then you'll not face any problem in designing professional blogger template.
Step 1. Preparing Testing/Demo Blog For Creating Template
It is common thing that before creating any blogger template you'll make the demo blog for that template. So, create a blog and publish more than 10+ posts on it. There should be one image, all heading, 4-5 text paragraphs, numbered list, bullet list and quote in every post. We'll design these each and every thing so make 10+ posts with these all things and also integrate some important widgets in footer or sidebar. After that, you can use any default template on it but soon we'll remove it and design another template on it. 
Step 2. Understanding Basic Structure Of Blogger Template
Before starting the template we should understand the basic structure of blogger template. We can also say that we're going to create simple empty page of blogger template. So, I've prepare the basic coding which will help you to understand basic structure.

<?xml version="1.0" encoding="UTF-8" ?>
<!DOCTYPE html>
<html xmlns='http://www.w3.org/1999/xhtml' xmlns:b='http://www.google.com/2005/gml/b' xmlns:data='http://www.google.com/2005/gml/data' xmlns:expr='http://www.google.com/2005/gml/expr'>
  <head>

    <b:include data='blog' name='all-head-content'/>

<title>
      <b:if cond='data:blog.pageType == &quot;index&quot;'>
        <data:blog.pageTitle/>
        <b:else/>
        <b:if cond='data:blog.pageType != &quot;error_page&quot;'>
          <data:blog.pageName/> | <data:blog.title/>
          <b:else/>
          Page Not Found | <data:blog.title/>
        </b:if>
      </b:if>
    </title>

    <b:skin><![CDATA[

body {
background:white;
color:black;
}
#Navbar1 {dispaly:none!important;}
]]></b:skin>

</head>
<body>

  <b:section class='navbar' id='navbar' maxwidgets='1' showaddelement='no'>
<b:widget id='Navbar1' locked='true' title='Navbar' type='Navbar'/>
</b:section>

</body>
</html>

In the above basic coding, you'll see that there are XML and HTML tags in the starting which means that this is built with XML and HTML. The main extension for this coding will be .XML. If you copy the above coding and paste it with the whole coding of a template then it will be saved and will show nothing on blog because this is simple blank HTML page. Let's understand the basic structure.

1. XML and HTML tags : As I already told you that XML and HTML tags are the main tags in which whole template will be stored. If we want to save this template in computer then we'll choose .XML extension while saving because blogger supports only .XML file templates.

2. Long <title> Coding : If you look in the title code below <head> you'll see long coding between <title> tag. Basically, That is customized title coding which has many benefits. We've used conditional tags to customize this title coding. The first condition tells that if someone opens the homepage or index main page then it will write the blog title as title of the webpage. Second condition is to show the post or page title first and show blog title after post or page title. In the last, there is 404 error page title coding.
3. <b:skin> Tag For Storing Stylesheet : There is additional built in tag for blogger templates to use <b:skin> tag with CDATA for storing the whole CSS or stylesheet of the blog. In these tags, you'll only see CSS which is being used in the whole blog. So, every CSS which you'll write should be placed in these tags.

4. <b:section> Tags For Widgets : In blogger, we use these tags to create widgets. Most important things like Blog Title and Content are done by implementing widgets in templates. In short, There are default widgets which are for Header and Blog Content which we use while creating template. For creating widgets, we should cover them with <b:section> tags which will help us to prepare layout page.

Step 3. Creating Header 

After learning the basic structure, let's get started by creating header of blog. Basically, There are only two important things to create a blogger template. First one is Header and second one is Blog Content. Other things are also important but these are most ones. We'll use custom Header widget and will customize it according to our needs. Basically, Header is a widget and you know for creating widget, we should create section for a single or multiple widgets. Copy the code below and paste it anywhere in the of template where you want to display Header widget.

<b:section class='header' id='header' maxwidgets='1' showaddelement='no'>
        <b:widget id='Header1' locked='true' title='' type='Header'></b:widget>
</b:section>

The above coding is not complete coding of Header but when you'll integrate the above coding in template then it will automatically become longer. Save this template, reload the Edit HTML page and you'll see expand arrow in the left side of <b:widget> tag. Blogger will automatically write the default coding on it. So, let's understand this header coding.

1. <b:section> having class='header' and id='header' : First of all, in the section tag, you'll see class='header' and id='header' which are common CSS class and id tags. So, by the help of these tags, you can do customization of header like giving specific width, height, margin, padding, font size, color etc to the header section only.

2. <b:section> having maxwidgets='1' : I don't need to explain these simple things, but for totally newbies I'll explain it. There is another XML tag of blogger which is maxwidgets='1' by this, we can simply set the number of maximum widgets in that section just replacing the number 1.

3. <b:section> having showaddelement='no' : This is just another simple tag by which we can disable or enable the Add a Gadget option.

4.<b:widget> having id='Header1' : In the header widget, there is CSS id tag by which we customize the header widget with CSS.

5. <b:widget> having locked='true' : This tag allows you to lock and unlock widgets easily by choosing true or false. When the widget is locked, one can't easily edit that through layout page.

The current settings for this header widget and section are fine so we'll not edit them. Below, I'm going to give you class and ID CSS tags which will help you to customize header widget. Simply, add this below CSS between <b:skin> tag and fill them with your own properties.

#header {  }

#header h1 {  }

#header h1 a {  }

#header .description {  }

Step 4. Creating Pages Menu Widget

I forgot to mention the pages menu widget which is also important for creating menu. That kind of menu only displays the those links which are actually pages made in blogger blog. In default blogger templates, it's mostly used so here I'm going to teach you how can we implement them in our blogs. I'll just give you default XML and HTML coding and will show you way to design that with CSS. If you're well known with HTML and CSS then you can easily make custom menu there anywhere in the template. But for this pages menu, you might face problem. Let's get started.

This pages menu widget is also done by creating widget section and widget. So, below I'm going to give you another code which will be having section tags and there will be page list widget which is the main thing. Just put the below coding anywhere where you want to show up that pages menu widget. 

<b:section class='tabs' id='crosscol' maxwidgets='1' showaddelement='yes'>
        <b:widget id='PageList1' locked='false' title='Pages' type='PageList'>
       </b:widget>
</b:section>

As we did in Header widget, this is also just a little piece of tags which will automatically complete itself with the default coding. For the customization, it's simple you can just take ID and Class tags from the above code and start writing your own CSS for them. But, This time I'm also going to give you CSS empty tags in which you've to fill properties according to your needs and design that better.

.tabs {  }
#corsscol {  }
#PageList1 {  }
#PageList1 ul {  }
#PageList1 ul li {  }
#PageList1 ul li a {  }

Step 5. Creating Blog or Content Widget

This is the main thing should is important most of all. In blogger, we create a default widget which is actual posts widget. In the layout pages, you might have seen the big widget named Blog Posts. We can easily create default blog posts widget with a bit of coding but customizing that according to our needs can be little difficult. First of all, open the html editor in blogger and paste the following blog posts widget code there.

<b:section class='main' id='main' preferred='yes' showaddelement='no'>
 <b:widget id='Blog1' locked='true' title='Blog Posts' type='Blog'>
 </b:widget>
</b:section>

Just like other widgets, we've also created section for that blog posts widget. After saving this widget in template, reload the html editor it will gain default coding of blog posts widget automatically. Here, get started in customizing the posts section according to your needs. Look at the class and id tags and write CSS for those tags to beautify posts area. When you'll expand blog posts widget, you'll get many <b:includable> tags that are actually in posts area. There will be specific includable tag having id='post' and var='post'. If you expand that includable tag then it will show up the coding of posts area only where you can do customizing easily.

Step 6. Creating Custom Gadget Area Like Sidebar and Footer

The above five steps will get you a simple template but creating custom gadgets area can be useful like making sidebar, footer and other gadget necessary gadget areas. So, in this step we're going to learn that how can we easily create custom gadgets section in blogger layout. We'll just write <b:section> tag in which we can add widgets as more as we want. Go to html editor and paste the following code anywhere you want to create the gadgets area or section.

<b:section class='' id='' maxwidgets='' showaddelement='yes'>

</b:section>

There is nothing special then tags in the above coding. Class and ID tags are empty where you can add your own custom names to call the CSS for that section. You can use class and ID to call CSS and beauty that gadgets section by adding any width, height, padding, margin etc. Another tag, maxwidgets='' is also in which you write any maximum number like 10 so that section wouldn't contain more than 10 widgets. If you want to show Add a Gadget option in layout then remain the yes in the showaddelement tag otherwise overwrite it with no.

Step 7. Setting up Layout Page

While creating template, also take care of layout page in blogger blog because that page depends on the template of a blog. If you do the things correctly then it won't get messed up but if you're facing problem then we've solution for this. We can rearrange the widgets and gadget sections there through using simple CSS. And for what, I've already written great post on fixing blogger layout page messed up. For rearranging the widgets in layout page, we'll use CSS and it will be like this. 

body#layout #widgetID { The Properties For Widget In Layout Page Goes Here }
body#layout #widgetID2 { The Properties For Widget In Layout Page Goes Here }
body#layout #widgetID3 { The Properties For Widget In Layout Page Goes Here }

Advanced Guide

Anyone who has basic knowledge of web designing can develop blogger template just by using simple HTML and CSS. Newbies might face problem in understanding the structure of blogger template but if you keep doing practice then you in a few days, you can be expert in that. Those web designers who can create HTML Templates or any other blogging platform themes then I don't think they're going to face any problem. Even designing blogger templates is one of the most easiest platforms than others. 

Above we've only created the simple blogger template which contains header, pages menu and blog posts. There is no sidebar and footer in the above template. You can make sidebar by giving specific width to posts widget, float blog posts widget to left and create another section which will be sidebar. You'll need to float sidebar in right and also give such width to those blog posts and sidebar sections that these both should suite on the area. You can do many more experiments with blogger template designs and also you can cover each widgets section with specific HTML div tags. 

While creating blogger templates, sometimes I make use of Inspect Element in Google Chrome which is common coding tool and it helps to edit any webpage. It will also help you to find the specific Class and ID tags of anything and you can customize them through CSS.

Final Words

So friends, that's how we can easily create blogger template from scratch. These were the basics of creating blogger template but I recommend you to keep doing practice that will help you to be more comfortable in coding blogger templates. I hope this little guide is going to help you in understanding the structure of blogger templates and designing them. If you're good in web design then you can become professional blogger templates designer. Best of luck in developing blogger templates. Have a nice day!


Photobucket